Part of the appeal of succulents is their ability to propagate. Plant propagation is the process of creating new plants from the plants you already have. In the wild, propagation from seeds is the most common method. This is achieved from flowering, pollination, fertilization, and eventually seed formation.
As natural habitats of succulents and cacti decline, the need to propagate and maintain these species in cultivation becomes more and more crucial for their continued existence. Not only that, but propagation has become part of the charm of growing these plants.
Growers and hobbyists who have tried their hand at propagating succulents find it highly rewarding and engaging.

There are several ways to propagate succulents plants. Certain species are easier to propagate than others. It takes a little research and some trial and error, but for the most part propagating is not difficult. Some of the most common ways to propagate succulents are:
Propagating from Leaves
One of the most common ways to propagate succulent plants is through leaf propagation. Simply put, propagating the leaves can be as simple as having a leaf naturally fall to the ground, root itself and grow into a new plant.
You can also intentionally propagate leaves by carefully removing the leaves from a healthy plant, placing them in a suitable potting medium and wait for the leaves to root and grow into new plants. Propagating from leaf cuttings is usually done with several leaves at once.
Leaf cuttings can be easily obtained from your fallen leaves, from discarded plant scraps, or by purchasing them. The photo below shows a fallen leave that had grown roots and little plant.


The photo below shows one of our Jade Leaf propagating, it had grown roots with little Jade plants growing.
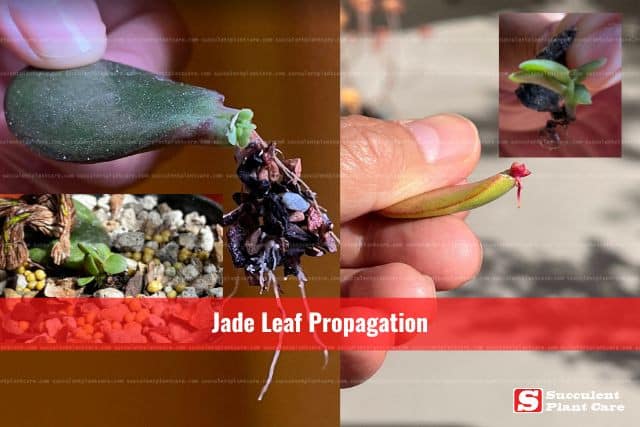

The Photo below shows a Gollum Jade Leaf growing new roots on my husbands hands. You can propagate a Gollum Jade Plant this way as well.
How to Propagate Succulents from Leaf Cuttings

Step 1
Choose healthy leaves. You will have better success when you start with a healthy mother plant and healthy leaves. Choose leaves that are uniformly colored without any discolorations, spots or marks. Do not use leaves that are damaged, ripped, torn or misshapen. Look for full and plump leaves, not dehydrated and flat leaves.


Step 2
Gently remove the leaves from the stem. Using your fingers, gently twist off the leaves from the stem with your thumb and forefinger. Some leaves come off easily, some are firmly attached to the stem.
Gently wiggle the leaf back and forth until the whole leaf comes off. You want the whole leaf including the base that attaches to the stem. If the base of the leaf does not come off, or if the leaf gets damaged, it will not survive.


Step 3
Wait for the leaf wounds to dry. Once you successfully remove the leaves from the stem, wait for the wounds to dry. This can take anywhere from two days to about a week. You will see a callous or scab form at the base of the leaf where it was detached from the stem.
The leaves need to be placed somewhere warm and away from direct sunlight during this process. The leaves need to be dry and calloused over before you place them in the potting soil or they can rot and die.


Step 4
Dip the leaves in rooting hormone (optional). Dip the calloused end of the leaf into the rooting hormone then immediately stick the same end into a suitable potting mix.
Pack the soil around the leaf to secure it. Rooting hormone is optional and you can skip this stage if you decide not to use a rooting hormone. Just stick the calloused end of the leaf directly into the potting mix without a rooting hormone.


Step 5
Lay them flat. Another way is to lay the leaves flat on a bed of suitable potting soil instead of sticking them in the soil. Leave some room between the leaves to allow for space for new plant growth.


Step 6
Keep away from direct sunlight. While waiting for the leaf cuttings to root, keep them away from direct sunlight. You can place them in a shaded area away from full sun. Leaf cuttings can shrivel and die when exposed to direct sunlight or full sun.
Step 7
Mist the leaves. Instead of watering, use a spray bottle to mist the soil. Rooting succulents need a little more water than mature plants. Mist the soil daily if the climate you live in is dry. If you live in a more humid climate and the soil stays moist, mist every few days or until the soil feels dry.
Step 8
Roots will start to grow. After about four weeks, you will start to see little pink roots growing from the cut. If you laid the leaves flat on the soil this is easier to see. If the cut end of the leaves are buried in the soil, you will not see the roots growing unless you pull them out of the soil.
You can cover the exposed growing roots with a thin layer of soil to prevent them from drying out. Continue to mist the soil as needed.
Step 9
A new plant emerges. Depending on the type of plant you have, a new plant eventually emerges with leaves of its own where the roots are growing. This can take anywhere from a few weeks to a few months.
The leaf that you used to propagate will start to wither on its own. You can choose to gently twist the leaf off or wait for it to fall off on its own. When removing the mother leaf, be careful not to damage the young roots.
Step 10
Transplant the new plant. When the baby plant becomes bigger and the mother leaf withers, it is time to transplant the succulent into its own pot. If the withered mother leaf is still attached to the new plant, gently pull it off. Transplant the baby plant in its own pot using a suitable potting mix.
Step 11
Protect the new plants from direct sunlight. The new plants are still delicate at this stage and will not be able to tolerate full sun. Place in a shaded or partially shaded area away from direct sunlight to avoid scorching the new plant.
Step 12
Water occasionally. Succulent cuttings need a little more water than mature plants until they establish roots. You can mist the soil or lightly water the soil every few days or whenever the soil feels dry. Once the plant is more established, water as you normally would your succulent plants and let the soil dry out between waterings.
Step 13
Slowly transition to a brighter location. Once your plant is more established, you can slowly increase the intensity of the sun it receives. Your plant will gradually grow into a mature plant.
Propagating from Stem Cuttings
Propagation from stem cuttings is the most common and easiest way to propagate succulents. When done correctly, propagating from stem cuttings will more likely give you a higher success rate than propagating from leaf cuttings.
Stem cuttings are taken from an existing plant, then allowed to dry and callous. The cuttings will eventually start rooting from the cut end and start growing as a new plant. Stem cuttings are also available for purchase.


How to Propagate Succulents from Stem Cuttings
Step 1
Disinfect your tools. Use a sharp knife or scissors. Make sure the shear, knife, or pruner you are using is cleaned and disinfected to prevent the spread of disease. You can wash them with warm soapy water or use alcohol wipes to disinfect.
Be careful to disinfect every time you perform a cutting by wiping the tool with alcohol to avoid introducing fungus and diseases.


Step 2
Select a stem to cut. Ideally, you want to choose a healthy plant that is actively growing to have a better success rate. Avoid using stems with visible signs of stress, disease or discoloration. Choose a stem that is long enough, and cut directly beneath the stem joint, or beneath the point where a leaf or bud joins the stem.


Step 3
Peel the bottom leaves off. Remove the bottom leaves off the stem. You need about two to four inches of the bottom stem to be bare. The leaves you remove may also be used to propagate–see above on how to propagate from leaf cuttings.
If you plan to use the leaves to propagate, gently remove the leaves so the whole portion of the leaf, from the base to the tip, are removed.


Step 4
Let the cuttings dry out. In a shaded area, let the cutting dry out for at least one whole day or more. The stem cutting should be allowed to completely dry out and heal before planting, otherwise it can rot and die before the propagation process is complete. Protect the cuttings from direct sunlight.
Step 5
Dip in a rooting hormone (optional). Once dry, you can dip the cut end into a rooting hormone. This is completely optional and can be skipped if desired. Other growers notice higher success rate and shorter rooting time when rooting hormones are used.
Step 6
Plant the cuttings. Once the cutting dries, prepare a suitable potting mix and a pot that is the right size for the cuttings. Stem cuttings can be planted by burying the stem until the lowest leaves are just above soil level.
Step 7
Water occasionally. Succulent cuttings need a little more water that mature plants until they establish roots. You can mist the soil or lightly water the soil every few days or whenever the soil feels dry.
You will begin to see new roots in about four weeks or so. To check for new roots, you can pull the stem cutting and check for new roots. The cuttings may start looking like they are drying out. This means the plant is using its stored energy to grow new roots.
Step 8
Protect from direct sunlight. Place the stem cuttings in a shaded or partially shaded area while rooting. Direct sunlight can burn the tender plants.
Step 9
Decrease watering and increase sunlight. Once the root system is more established, you can decrease watering to about once a week. Water as you normally would your other succulents. Slowly acclimate your new plant to sunlight by gradually increasing the intensity of sunlight it receives.
You have a new plant. You can now congratulate yourself for successfully propagating your plant. You can care for the plant as you normally care for other succulents.
Propagating from Pups or Offsets/Offshoots
Plants that produce offshoots or pups are basically cloning themselves. Not all succulents produce offshoots and pups, but the ones that do pretty much multiply on their own. Hens and chicks, aloe, certain haworthia and cacti species are among the many others that produce pups or offshoots.
You can carefully remove the pups and offshoots, place them in a suitable potting mix and start a new plant that way. Removing offshoots from the mother plant improves its health by refocusing energy to the growth of the main plant instead of supporting its pups.


How to Propagate Succulents from Pups or Offshoots/Offsets
Step 1
Find plants that have produced pups or offshoots. Pups and offshoots are the babies that grow from the mother plant. Not all succulent plants produce pups or offshoots. Many succulent species do, including hens and chicks, aloe, and certain haworthia and cacti species.
Step 2
Disinfect your knife. Use a sharp knife that has been cleaned or disinfected. You can do this by washing with warm soapy water or wiping with rubbing alcohol. Be careful to disinfect every time you perform a cutting by wiping the knife with alcohol to avoid introducing fungus or diseases.
Step 3
Find offshoots or pups to be removed. Once an offshoot or a pup has grown large enough or has started producing roots, they can be removed from the mother plant. Try to get some roots when removing the pup.
You can remove a pup without roots, but you will have much greater success with ones that have roots already growing. Pups or offshoots without roots will eventually root themselves, but pups and offshoots with existing roots have a greater chance of survival on their own.
Step 4
Remove the offshoot. You can use a clean knife to gently remove the pup or offshoot from the mother plant. Some offshoots or pups are easier to remove than others. Sometimes they can be separated by gently twisting the pup off.
Other times you need to use a sharp tool to remove the pup. Carefully separate the baby plant from its mother plant by inserting the knife blade between the mother plant and the offshoot. Slowly pull apart the pup from the mother plant and sever the connecting root.
If removing the pup while still planted in the soil, insert the knife blade into the soil between the mother plant and the offshoot. Slide the blade down the soil to sever the connecting roots.
Carve out a 2-inch radius in the soil around the base of the offshoot then dig a few inches down the radial parameter using the sharp end of a small spade. Insert the spade at an angle underneath the offshoot and carefully pry it loose from the soil to remove.
Step 5
Plant the pup. Once the pup is removed it can be planted on its own. Prepare a suitable well draining potting mix and fill a small pot with it. Plant the pup or offshoot into the soil. Pack the soil lightly around the plant until secure.
Step 6
Water occasionally. Pups and offshoots need a little more moisture than mature plants. Lightly mist the soil with a spray bottle every few days or when the soil feels dry. Once the plant is more established and rooted, decrease watering to about once a week.
Step 7
Protect from direct sunlight. Protect new plants from direct sunlight when initially planted on its own pot to prevent sun damage. Gradually increase sunlight and sun exposure according to the plant’s needs as the plant matures.


These are pups or offshoots from the mother plant shown here
Propagating from seeds
You can harvest or sow your own seeds from an existing plant. Propagating from seeds take quite some time and is not the route to take if you want faster results; but this process can also be highly rewarding when done successfully. Seeds can be harvested from the plant’s flowers.
The flowers need to be pollinated either by pollinators or through self pollination. Self pollination can be achieved by using a paint brush to pollinate the flowers. If all goes well fertilization will occur.


The flowers can then be dried and stored and seeds harvested from them. The harvested seeds need to be provided with the right environment to germinate into seedlings. The germinated seedlings will be ready to be transplanted and treated as new plants once they grow big enough.
Instead of harvesting your own seeds, you can also purchase seeds and germinate them yourselves. Seeds usually cost a fraction of what an actual plant costs. You will need a whole lot of seeds since few seedlings survive to maturity.


How to Propagate Succulents in Water
Step 1
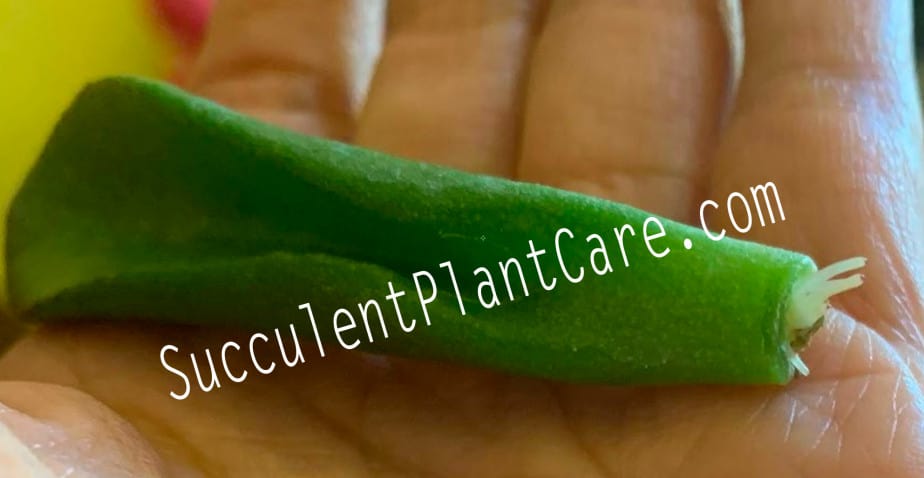
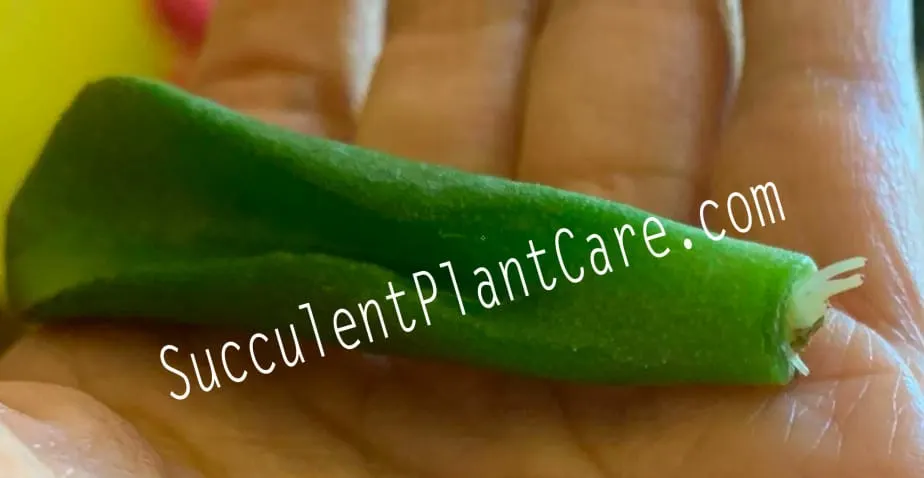
Get a cutting. Snip a stem cutting from a succulent plant. Plants that have become leggy can be a great source of stem cuttings. Leave about two inches or more of bare stem.

The Photo below shows you a few of our Jade stem cuttings in tiny baby food jars to go through water propagation. You don’t really need a big bottle, once you have roots you can immediately transfer them.


Step 2
Let the cuttings dry. Allow the cutting to dry for a couple of days until the cut end have calloused or dried.
Step 3
Place in water. Find a cup that is the right size for the cuttings and add water. Place the cutting so that the end of the stem is resting just above the surface of the water.
Step 4
Place in a bright spot. Leave the cup in a sunny or well lit area.
Step 5
Wait for roots to grow. Add water as needed.
Step 6
Plant the rooted cutting. Once roots have grown, remove the rooted cuttings from water and let them dry for a few days. The rooted cutting can then be planted in a suitable potting mix.
Step 7
Water occasionally. Baby plants need a little more moisture than mature plants. Lightly mist the soil with a spray bottle every few days or when the soil feels dry. Once the plant is more established and rooted, decrease watering to about once a week.
Step 8
Protect from direct sunlight. Protect new plants from direct sunlight when initially planted on its own pot to prevent sun damage. Gradually increase sunlight and sun exposure according to the plant’s needs as the plant matures.
When NOT to Propagate Succulents
The start of the growing season is a good time to think about propagating your succulents. To ensure propagation success, try not to propagate during these times:
During a heatwave
It is not the best time to propagate during a heatwave. When plants are stressed and focused on survival, they are not in the best condition to multiply. It is better to wait until the heatwave has passed or during a milder, less hostile season to get the optimal result you are looking for when propagating.
Pruning and cutting your plant for propagation also introduces more stress to the plant, as it needs to focus on healing and regrowing as well as surviving these harsh conditions.
However, if plants are kept indoors and protected from the intense heat outside, or kept in a temperature controlled environment, then propagating during a heatwave doesn’t pose that much of a problem.
During frost or freezing temperatures
Most succulent plants go dormant during freezing temperatures and frost. During frost, plants shut down and are not actively growing. Propagating your plants around this time is will not provide the best results you are aiming for.
Wait until frost is over before you propagate to ensure the optimal survival of the plants. Pruning or cutting your plant for propagation during this time introduces new stress to the plant as it needs to focus its energy on healing and regrowing.
What is a rooting hormone?
Rooting hormone is used to stimulate the plant cutting so it speeds up the process of sending out new roots or new nodes. Rooting hormone also protects the cuttings from fungus and disease that the newly cut plants are susceptible to. It can come in either powder, gel or liquid form.
Rooting hormones are naturally occurring or synthetic hormones. While not necessary, it helps to speed up the process and acts as a catalyst for the roots to materialize. It can also provide a greater success rate when rooting newly cut plants.
Using a rooting hormone to root succulent cuttings is not necessary and some growers choose not to use it. Others swear by it and use it to root all their cuttings.


Natural rooting hormones
There are natural products you can use that can help with the process of rooting your succulent plants. Some of these products are common household items you may have in your shelf.
Cinnamon powder–I first heard about cinnamon powder being used by growers as a rooting agent for succulent cuttings from a Succulent Group I belong in. Apparently it is commonly used as a rooting agent. Just dip the cuttings in cinnamon powder or sprinkle cinnamon onto the cuttings or the soil.
Cinnamon also acts as a wound repairer and a fungicide. It can help keep the cuttings free from diseases while rooting and the soil free from fungal growth.
Honey–Known for its antifungal and antibacterial properties, it makes sense that honey is also used as a natural rooting agent. There are a few recipes out there for honey as a rooting agent.
Here’s an easy recipe to try:
1 tablespoon honey (pure or raw honey is recommended)
2 cups boiling water
Boil 2 cups of water and remove from heat. Mix the honey in the water. Let it cool. Store the mixture in an airtight jar or container. Keep away from light. To use, dip the cuttings in the solution. The mixture can be stored and will last for about two weeks.
Apple Cider Vinegar–You can try using apple cider vinegar to help speed up the process of rooting your succulent cuttings. Apple cider vinegar is actually commonly used in organic gardening as a weed killer. You only need to use a little apple cider vinegar, too much may prevent rooting.
Here’s an easy recipe to try:
1/2 teaspoon apple cider vinegar
8 cups of water
Mix the apple cider vinegar and water. To use as a rooting hormone, dip the cuttings into the solution.
I have plenty of propagation success stories. Please click on “Easiest Way to Propagate Succulents” and “What is Succulent Propagation?” to read some of my propagation success stories.


Pin this to save for later or share with others now!