Can You Use Pots without Drainage Holes for Succulents?
Part of the fun of growing and collecting succulent plants is finding unique containers to put them in. That little terrarium you’ve been eyeing seems to be perfect for your succulents.

Or maybe there’s this beautiful vessel you want to use for your plants. But you hesitate because they don’t have drainage. Do you need containers with drainage holes for succulents? Would your plants be ok in one of these containers without drainage?
Why Drainage Holes are Important for Succulents
Some people advise against using containers without drainage holes for succulents. The reason being is that succulents do not like to sit in water. Succulents hold water in their stems, leaves, and tissues. They like to stay dry and are more susceptible to root rot if kept moist. Having drainage holes allows excess water to drain out of the pots preventing root rot.
Will the Plants Survive in Containers without Holes?
While not ideal, using pots without drainage is definitely possible. My personal advice is, if you are new to this and your are planting your very first succulent arrangement, try as much as possible to use a container with drainage holes. Or if you have a new succulent plant that you are not too familiar with, especially if you paid a lot of money for it or it’s a rare kind, use a pot with drainage holes to ensure the best success. Once you get more comfortable with watering techniques and you have become more familiar with caring for these plants, then you can go ahead and experiment with containers without drainage. You want your first few experiences with potting and caring for succulent plants to be successful. Being successful at keeping your plants alive and thriving in the beginning will give you the confidence you need to be more adventurous in the future.
My Own Experience with Pots without Drainage:
I could not resist when I saw this little container. First of all, it was on sale and I am a sucker for bargains. I think it was 50% off. It is made of resin and some other materials. This is not sturdy at all. In fact, it is very delicate. It chipped and broke in a few areas as soon as I got it home and I had to hot glue the broken pieces several times. Needless to say, drilling a hole in this would just shatter the whole thing in little pieces. I justified this purchase by telling myself that it was on sale. This is a picture of it a year later. Obviously, the plants are pretty happy in here. I think some of them actually need to be repotted in a bigger container to support their growing root system. I am more careful with watering these plants than with my other plants with drainage holes. I do not water these plants the same way I do my other plants with drainage holes. I am a lot more careful with watering and making sure the plants are not sitting in water for too long. I move it in the shade when there is rain in the forecast.


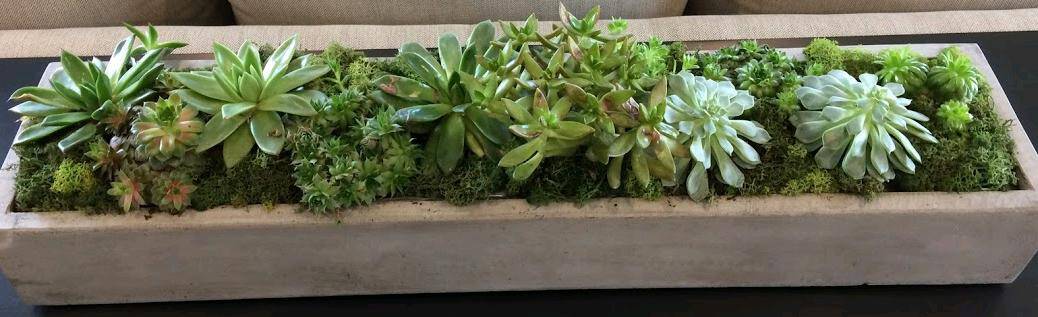
Here is another container that I have had success with. I love how this container looks and the quality is outstanding. I am not entirely sure what it is made of but it is very heavy and sturdy. It almost feels like stone or cement. I did not want to drill holes in this because the material is heavy and thick. These plants have been in this container for over a year now. In fact, I have already removed some of the plants growing in here because they were getting too big. Again, I do not let these plants sit in water too long. There was one instance where I had forgotten to move this container and left it outside in the rain. It rained hard for a few days and by the time I got a chance to check on the plants, they were swimming in water. I just carefully tilted the container to pour some of the excess water out and made sure they got plenty of sunlight to dry out (I live in sunny California which helps tremendously). And as you can see, the plants are doing fine.


From my experience, you can definitely use containers without drainage holes. Again, I would not recommend them for your first few plants but as you get the hang of caring for succulents, you can work with these containers. So if you are tempted to use a container without drainage holes, it is highly possible but know that it will be extra tricky because there is more possibility of overwatering and drowning your plants.
How to Water Succulents in Containers without Drainage Holes
If you have containers without drainage holes in them, you need to pay extra care and attention when watering your succulents. The key to plants’ survival is in your watering techniques. Allow plants to dry out in between waterings and feel the soil for moisture. The top inch of the soil needs to feel dry to the touch before you water. Remember that excess water cannot drain out of the holes so go easy on watering.
Using a syringe, a spray bottle, or squeeze bottle will help control the amount of water you put into the containers. When using a spray bottle, make sure to spray the soil or medium instead of just the top of the plant. You want the water to get to the roots where it is absorbed by the plant and not just mist the plant from the surface. Watering frequency also depends on the growing season and size of your container. During the dry season or growing season, plants need more water. During the inactive growing season or when it’s cooler, water less frequently. Where I live, the climate is very dry so I water approximately every 7-10 days in the summer and I cut down on watering to between 10-14 days or longer during the colder months. If you live in a climate with high humidity, you do not need to water as much. Check the soil for moisture before watering.
If unsure in the beginning, water the plants lightly and adjust as needed. It is better to under water than to over water until you get the hang of watering your plants in containers without drainage holes. If you accidentally pour too much water, you can get rid of the excess moisture by using a dry towel to dab the water. You can also pour excess water out carefully. Watering should be monitored closely, especially if you are new to this.
Consider Adding these Materials in the Pot to Increase Survival:
- Use a layer of rocks in the bottom
By adding rocks, pebbles, stones or pumice in the bottom of the pot, you can help prevent your plants’ roots from sitting in wet soil. Rocks have more space between them than soil, which is more compact. The rocks in the bottom will give the water in the soil somewhere to drain down to, thus helping to prevent the roots from sitting in wet soil too long.
- Use Activated Charcoal
Adding a layer of activated charcoal in the bottom of the pot can also help remove excess moisture from the soil by helping to absorb the water. Activated charcoal also contains natural antimicrobial properties, which can be helpful in preventing bacteria from entering your plants and causing disease.
How to Drill a Hole in Ceramic Pots or Glass
To drill or not to drill? Let’s say you really want to use a certain container without drainage hole but you’re really concerned about watering issues. You can consider drilling your own drainage holes into the container by using a drill. This will help solve the issue of not having any drainage. Here is an easy guide to help you get started.
Things you need:
Old towel or Cloth
Cold water (you can use spray bottle, water bottle or a hose)
Painter’s tape or masking tape
Diamond tile drill bit
Drill
Protective goggles
- Lay towel or cloth down on a table or counter.
- Place the ceramic pot upside down on the towel so that the bottom of the pot is facing you.
- Place a piece of painter’s tape or two to three layers of masking tape on the bottom of the pot where you want to hole to go. This helps to keep the drill steady and have something to grab onto.
- Spray or pour water on the pot. This is important to keep the ceramic or glass cool. Too much heat from the drill can break it.
- Wear protective goggles before drilling. Go in at an angle at the lowest speed and drill a small indentation on the bottom where you want the hole to go. Remove the tape.
- Continue drilling at an angle. As the drill bit goes down, slowly bring the drill upright until it is vertical and going straight down the ceramic pot.
- Apply even pressure and do not force the drill down. Spraying or pour water on the as you are drilling until the drill goes all the way through.
- You now have yourself a pot with a drainage hole.
If you are looking to purchase a drill or diamond drill bits, please check out my succulent gardening tools page for recommendations.
Tools such as moisture meters and hygrometers help determine the moisture in the soil and in the air. Please click on my resource page for recommended products.


Photo by Scott Webb on Unsplash