All About Jelly Beans or Pork and Beans (Sedum Rubrotinctum)
Native to Mexico, Sedum Rubrotinctum or Jelly Bean Plants have jelly bean-shaped leaves that are green in the shade and turn red at the tips when exposed to full sun. They produce bright yellow, star-shaped flowers around springtime. Other common names are Pork and Beans and Christmas Cheer.
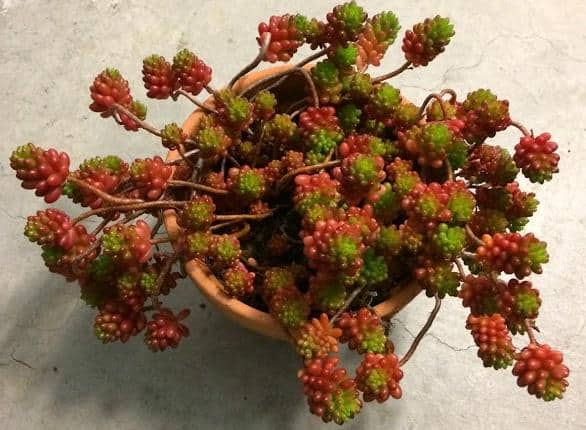
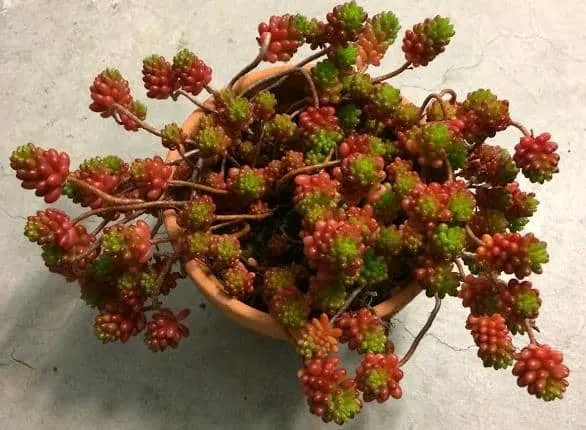
These have become one of my go-to plants and use them in a lot of my arrangements. Not only are they easy plants to care for, but they are also easy to propagate and multiply. Their stems sprawl and spread out as they grow. They do well as ground cover or as container plants.
I have always grown mine in containers. I leave the plants outdoors all year round, some in full sun, which gives them their nice reddish color. If you are looking for a fun and easy plant, I highly recommend one of these.
How to Care for Jelly Bean Plants (Sedum Rubrotinctum):
Watering
These plants are kept outdoors all year and are usually ‘ignored’. I water sparingly in winter when it rains more here in Northern California and rely mostly on rainwater. I increase watering when the weather gets warmer and the rain stops.
Generally, I water every ten days during spring and summer months, or more during really hot days or during a heatwave. I give the plant a good drink and leave it alone until it dries out. I live in a very dry climate and watering is necessary. If you live in a humid climate, you might need to water less.
Observe the plant to see how it looks. If the little jelly bean leaves start to shrivel and get wrinkly and soft, then you need to water more. Feel the soil for moisture. If the top inch of the soil feels dry, then that’s usually a good indicator that the soil is dry and you can water again.
Some people use moisture meters to check for moisture, or another trick is to use a wooden bbq skewer stick to check for soil moisture. Just stick the skewer in the soil a few inches down. If the skewer comes up dry, then it is time to water. Refrain from watering if the skewer comes up wet.
Soil Medium
Like with other succulent plants, I use a well draining potting mix. I usually use a cactus mix and add in some perlite. I don’t measure it out completely but about 1:1 mixture of cactus mix and perlite is fine. I have also used an all-purpose potting mix combined with perlite in the past.
Sunlight
These plants adapt to different lighting conditions very well. I have some in full sun and some in partial shade and they are all doing fine. The ones in full sun or receive the most sun exposure develop the best color variations.
I have a pot that is receiving direct afternoon sun and is kept outside all year round. The plant has beautiful reddish hues. When they turn red, they are actually showing signs of stress. But the plants are just fine.
I have some that do not receive as much sun and they have more greens than red in their color. If you want to see more color changes in your Jelly Bean plant, provide more light, but do it slowly to avoid burning the plant. The one I have in full sun still get occasional sunburn when the weather gets too hot.
I simply move it to a shadier spot to provide some relief from the intense heat. These plants are frost tolerant up to a certain temperature. I do not move mines indoors during frost, but we do not get extensive freezing temperatures here in Northern California and we usually get bright sunlight during the day, so the plants do fine outdoors even during frost.
Fertilize
I typically do not fertilize my Jelly Bean plant regularly. I usually start fertilizing after the plant has been in the same pot and potting mix for over a year and the plant doesn’t appear to be thriving as much. I refrain from fertilizing if I just repotted the plant in fresh potting soil. When I start fertilizing, I only fertilize from spring to early fall and I use ¼ to ½ the recommended strength or dosage of fertilizer.
How To Propagate Jelly Bean Plants (Sedum Rubrotinctum)
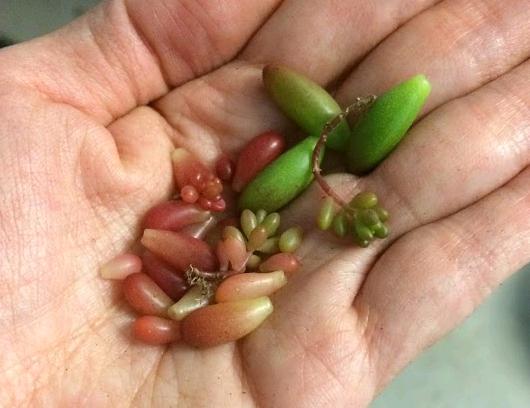
These plants easily propagate from leaf or stem cuttings. They root easily and often root on their own without any help. The leaves are quite fragile and fall off easily when handled or when you brush against the plant. The good news is the leaves are easily propagated and often root on their own.
I often find a leaf here and there that has fallen on the ground and has rooted on its own, sometimes already growing a new plant. I simply stick the fallen leaf back in the pot and let them grow. I have also taken stem cuttings to propagate and grow in other containers.
Step-by-Step Guide on How to Propagate Jelly Bean Plants

Propagate Jelly Bean Succulent Plant-Sedum Rubrotinctum from Leaves
From Leaves:
Step 1
Use a fallen leaf or break off a leaf from the stem. The leaf needs to be whole from the tip to the end for propagation to work. Use plump, healthy looking leaves. You will have more success with healthy leaves. Dried up or shriveled leaves will most likely not make it.
Step 2
Set the leaves aside and allow to dry. The leaves can then be set on a well-draining soil. From my experience with this plant, misting is not necessary.
Step 3
Keep the leaves away from direct sunlight. If left under full sun, the leaves will shrivel up and burn.
Step 4
Roots will start to grow in a few weeks. Once roots grow, you can mist the soil every few days or when the soil dries out.
Step 5
A new baby plant will soon emerge from the leaf. Continue misting every few days or when the soil dries out.
Step 6
Continue to let the plants grow into more mature plants. As the plant matures, you can slowly increase sunlight and decrease watering to once a week or when the soil feels dry.

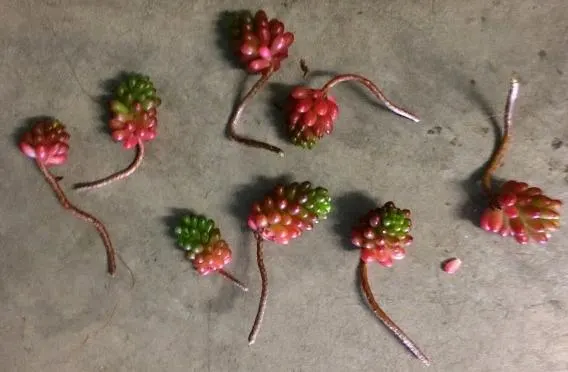
Propagate Jelly Bean Succulent Plant-Sedum Rubritinctum from Stem Cuttings
From Stem Cuttings:
Step 1
Choose a stem that has started to trail or become long to cut. You can also choose stems that have roots growing on them. Use clean sharp scissors to cut the stems.
Step 2
Allow the stem cuttings to dry for a day or two. These stems are thin and dry faster than other succulents with thicker stems.
Step 3
Prepare a well draining potting mix. Stick the stem cuttings in the soil.
Step 4
Place in a bright area but away from direct sunlight.
Step 5
Mist or water stem cuttings every few days, or when the soil feels dry to the touch.
Step 6
Once roots are established in a few weeks, you can decrease watering to about once a week.
Step 7
Slowly increase sun exposure as the plant matures.
How to Repot Jelly Bean Plants
One challenging part about repotting a Jelly Bean plant is the fragile leaves. You want to be careful how you handle them as the little jelly bean leaves can easily fall off.
If you notice them sprawling out of the pot like this, you don’t necessarily have to re-pot right away. I actually like how they look this way.


But this other one in another pot does not look as plump and vibrant and I wanted to repot these in fresh potting mix. I decided to put the two together in a bigger pot. That way they will have room to spread out and grow. So I decided to repot these two into a bigger planter.


The plant has become root bound in its terra cotta pot and was difficult to pry out without damaging the plant so I took my time with it. Using a small garden spade, I carefully dug around the sides of the pot to loosen the plant. It took some time but I was finally able to pull the plant out without much damage to the plant and the pot. (Tip: If you have a fragile plant you want to remove from its pot and you are afraid of damaging the plant, you can either cut the pot if plastic material or break the pot–only if you don’t mind losing the pot of course).
When repotting and removing a plant from its pot, try to do so when the soil is dry. The plant comes off easier when the soil is dry.


This second plant in the other pot came out without any difficulties mainly because the soil was very dry.


Find a planter to fill. I filled this planter with a combination of cactus soil and perlite. I carefully planted the plants in and also used some stem cuttings from the same plant to help fill in this planter.
What to do with fallen leaves? Here are the casualties from repotting. All these fallen leaves I just placed back in the pot with the rest of the plants. Some will root and grow and some will not make it. But from experience this plant roots and grows easily.


Lastly, I added a few finishing touches to add fun and humor to it. Donald duck was donated to me by my son (I actually asked him if I could have it and he said yes). The dinosaur digging in the soil is a broken beheaded eraser (courtesy of my daughter) that I thought would be funny to add here. My kids love it and so do I.
How to Take Clippings off to Repot
At the same time, I was also looking for a plant that would do well and look good in this pair of crocs. My baby girl has outgrown these and I thought they would make such a cute hanging planter. I needed small plants that trail, are hardy and would do well in these. So I decided to take clippings of these plants and place them in these crocs.
I tackled these two projects together in one day. Here’s how I did it:
Using Upcycled Crocs as Planters


These cute crocs are my baby girls first pair of crocs. I think they are so cute and I decided to use them as a hanging planter now that she’s outgrown them. These shoes also come with holes so I thought they would be perfect.
First, take some cuttings from stems that have become too elongated and allow the clippings to dry. Since these stems are thin, they don’t usually take that long too dry. One full day is often good enough. I made sure the crocs were clean.


Then I added cactus potting mix combined with perlite and filled the shoe all the way up to here. I made sure to pack the soil in.


Since I wanted to use these as a hanging planter, I tied twine rope on the straps. This was actually harder to do with soil in the shoes. I recommend doing this step first before filling the shoe with soil.


Lastly, I stuck the plant cuttings in the soil filled the area . I found that the plants were not staying in place so I had to make the stems a little shorter. You can also use wires or clips to hold the plants down if necessary.
The Finished Product
Here’s how it looks. I’ll keep this in a partially shaded area until the plants are rooted and established and can take more sun. As the plants root and grow, they will start sprawling out and trail, which would look really amazing in these crocs. Also, I realized these crocs would not hold up well in a very windy area, as you can imagine. If hanging outside, hang on a wall or something that can help steady the crocs when it gets windy.
Sedum Rubrotinctum ‘Aurora’ (Pink Jelly Bean Plant or Pink Pork and Beans)
Sedum Rubrotinctum ‘Aurora’ or Pink Jelly Beans are similar jelly bean plants that have a pinkish-mauve tone. The care and propagation for these are the same as with the other jelly bean plant. These are so pretty and very attractive and can be grown as ground cover or in containers. Easy going plants that I love to have in different containers so I spread them around through stem cuttings and leaf propagation.
Update: I’ve written about Sedum Rubrotinctum Aurora as well.
Finally, here’s where you can buy a jelly bean plant.


